
How to Create an Amazon Listing From Scratch (With Examples!) – Part 2
Table of Contents
We are back for Part 2 of our backpack Amazon listing walkthrough!
In Part 1 we covered Amazon keyword research in preparation to create a listing. Below, we will begin work on how to list products on Amazon! The first thing we need to fill out is our product title, so let us go back into Helium 10 Cerebro and check out the title density filter. This will show us the number of products with the searched keyword in their title. The lower it is, the higher chance you have of ranking for that particular keyword!
Remember when I asked you to keep your top 10 ASINs handy? Well, this is exactly where we will be needing them. When entering the ASINs into Cerebro, all filters remain the same as previously entered except the title density filter which will be set at a maximum of 3. I will copy my results from Cerebro and paste them into the Listing Builder title section.
The title is the most important part of your Amazon listing – it can make or break your conversion rates. Here are some tips to keep in mind when writing your product title for the Amazon marketplace.
- Avoid keyword stuffing – Title text must make sense and be descriptive of your product. Don’t just blindly throw every keyword you have in the mix!
- Include long-tail keyword phrases from your keyword bank where natural – This will help you rank for those keyword phrases and capture shoppers with true buying intent.
- Title case your words and do not include any emojis or characters for decoration – Your listing title should be legible!
The title I came up with is as follows:
Helium 10 Black Backpack with Laptop Compartment and USB Port Charger for Travelling, Professional Work or College, Large Laptop Backpack For men Fits 17 inch Book with Anti Theft Pockets
Wrapping Up The Research
Before we move on to listing bullet points, let us go back and do some more keyword research to strengthen our copywriting. Once again, we will be using those 10 ASINs I had asked you to keep handy. Take each ASIN, one at a time, and enter it into amazon.com. With each ASIN we want to run Review Insights (found within the Helium 10 Chrome Extension). We will select all options in the ratings filter and extract reviews to find out the top used phrases.

I am going to put together all these phrases from all 10 ASINs and narrow down a list. The following is a list I came up with.
- Well made
- Many pockets
- For traveling
- For work
- Plenty of room
- Very durable
- Inch laptop
- Water resistant
- High school
- Very comfortable
- Many compartments
I know for certain that my bullet points will be based on outlining these features because our research shows that the customers who are buying this kind of product are most interested in these key features. Another place where these phrases will be useful is when deciding on the images for my product. We will discuss images later in this article.
Some tips to keep in mind when writing the bullet points:
- Start each bullet point with a capital letter and use proper punctuation.
- Use all five bullet points and a minimum of 150 characters in each of your bullets to maximize the number of keywords included in your listing
Going Beyond The Bullet Points
Finding the right keywords is important, but now you have to transform them into meaningful and well-structured sentences for your bullet points!
Keywords are critical for becoming visible to your target audience and for ranking purposes. But to hit a home run, you need to get down to the real nitty-gritty of your product. This means knowing its dimensions, the fabric being used in it, the functions it provides, its distinguishing features, etc. Add all these details alongside your keywords to your bullet points.
Once you have your frontend copy written, you can start working on your backend copy. Backend copy is not visible to your audience so you can keyword stuff here to increase your chances of ranking your product. This may include all the remaining words and phrases from your word and phrases bank in your Listing Builder. The wonderful thing about working in Helium 10’s Amazon Listing Builder is it keeps showing you how many phrases and words you have knocked off the list, how many times you have used each, and the ones you have not used.
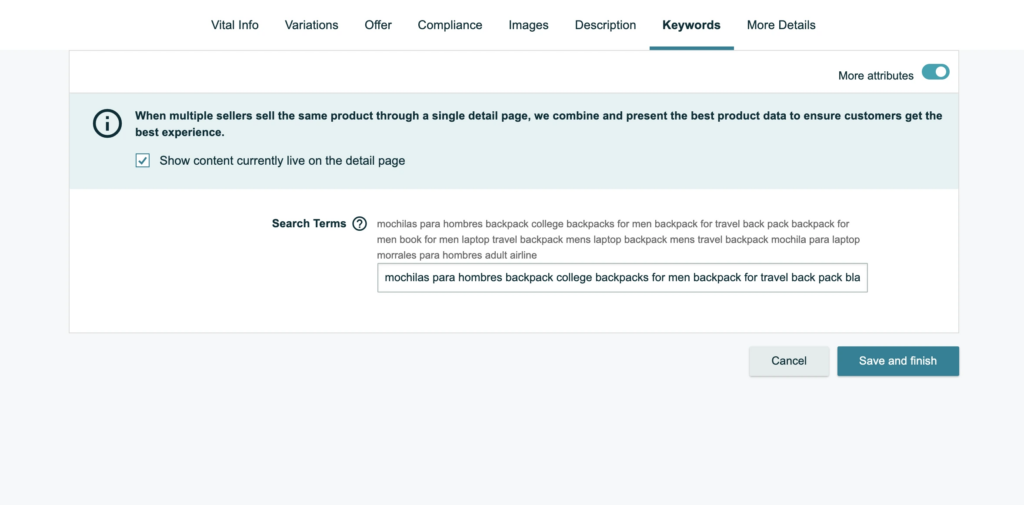
Bonus Point – For many of the marketplaces in Amazon, like the US and Canada, you will not be able to input “subject matter” through Seller Central. This is another great place to make use of Listing Builder because it allows you to include your subject matter into your listing and rank for those keywords. You can see below that subject matter is not visible in my own Seller Central account.
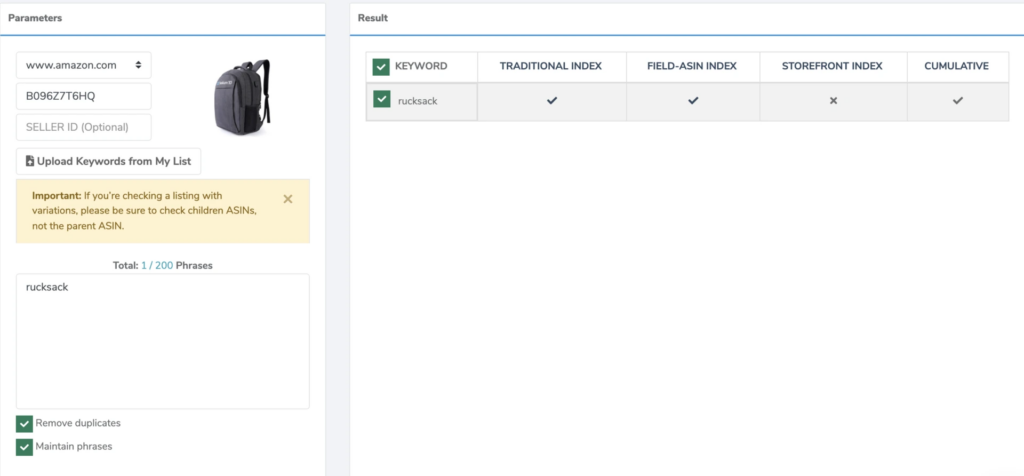
I know what you’re thinking, “How do I know if this Listing Builder subject matter even works since I can’t see it in seller central?” Well, let’s test it. I am going to put the word “rucksack” in my subject matter using Listing Builder, and nowhere else in my listing, to show you that this incredible tool actually works! Let’s run our tool Index Checker on this word to see if we are indexed for it. VIOLA!
Let’s say you now have a plethora of leftover words or phrases in your bank and you are unsure of which words to prioritize. You can filter out any words or phrases that are not the most important. Your next question most likely is… How do you know which keywords are more important?
The word bank in the Listing builder color codes words from red to black based on word frequency, red being the most dominant and black being the least.
The phrases section, on the other hand, color codes based on search volume, red being the most searched and black being the least searched.
Once you have completed your backend copy, you want to plan the photoshoot and take the pictures. Keep in mind, you need to come back into Listing Builder to take your listing live, once you have the pictures ready. To take the listing live, click the “sync to Amazon” button at the top right-hand corner of the page. This will not be able to sync your Amazon listing images, so you want to do it separately on Seller Central. Before we move on to that, we want to finalize our copy and make sure it’s perfect.
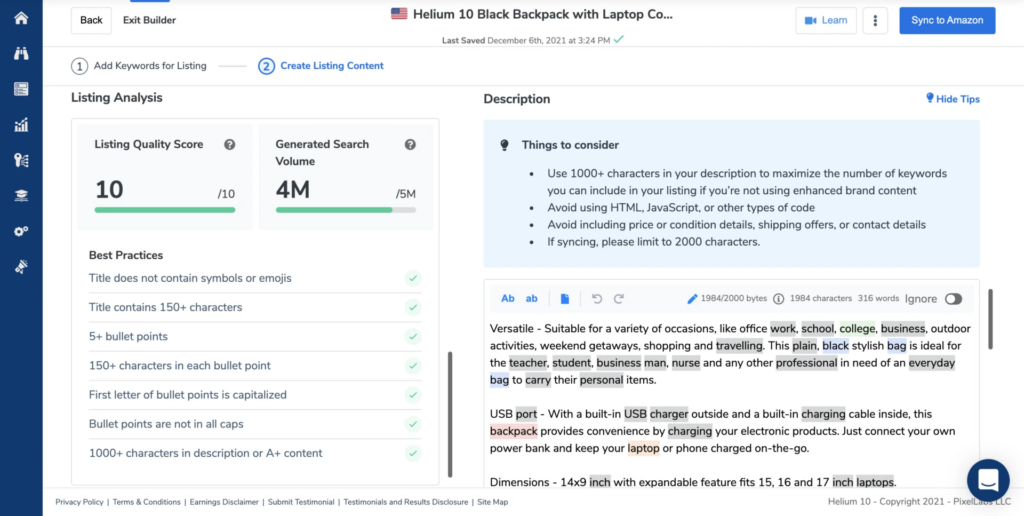
Let’s highlight a very useful feature within the Listing builder. When you scroll down, you will see a section called the Listing Analysis. This will give you a listing score based on important metrics for your listing, as well as tell you how much search volume you are generating with your keywords. Make sure to also click on the light bulb emoji next to every section to see some helpful tips on how to write good copy.
The last part of the listing is to include pictures of your product. For this, you will need a minimum of seven images. These seven images will include your main image, infographic images, and lifestyle images. For this Amazon listing, I will be modeling myself as well as taking pictures with the help of my tripod!
Main Product Image
Let us begin with the main image! This image is as important as your product title when it comes to conversion rates. It is the only thing your audience will see when scrolling through a sea of listings on Amazon. Make sure you put your all into your main image while also being compliant with the Amazon TOS. Here are some things to keep in mind:
- Put your product against a white background
- Cover as much of the space in the picture as possible
- Do not put any badges or icons in this picture
- Do not include props – items that are not being sold should not be a part of this picture
- Keep it as clean and visually pleasing as possible
Infographics & Lifestyle Images
As for the split between your infographic and lifestyle images, there are many factors that go into deciding how to create these listing images. As a general rule of thumb, if there is a lot of information you need to give out about your product then you probably want to include more infographic images in your listing. You can also determine this balance from the kinds of phrases you found when you ran Review Insights on your competitors.
If the phrases focus more on the functionality of the product then that is what is most important to your target audience.
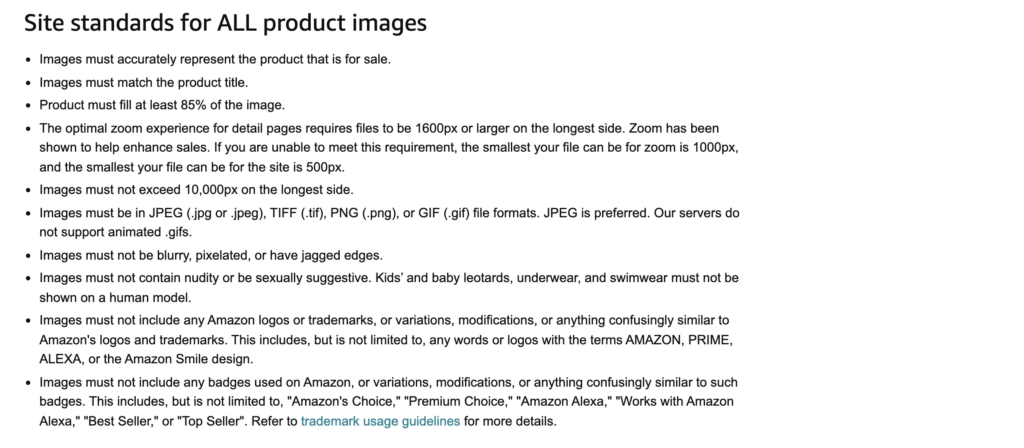
In my case, this is true. My product has a lot of features and my customer base wants to know about them before they make a decision on which backpack to buy. Make sure you go through the following best practices outlined by Amazon for the Seller Central users.
Creating an “Image Plan”
I will create a plan for my listing images so that my photoshoot goes smoothly. It will be a busy day and I do not want to miss any important angles or shots. My image plan is usually broken down into two segments: information and aesthetics.
For the former, I take inspiration from Amazon competition, and for the latter, I take inspiration from Pinterest. You will notice in my image plan that a lot of the information I will cover in my photos will be inspired by the Review Insights information as well as the Q/A section of the listing. This will pertain to features the customer base likes or dislikes about the product and the questions they want answered by looking at your listing.
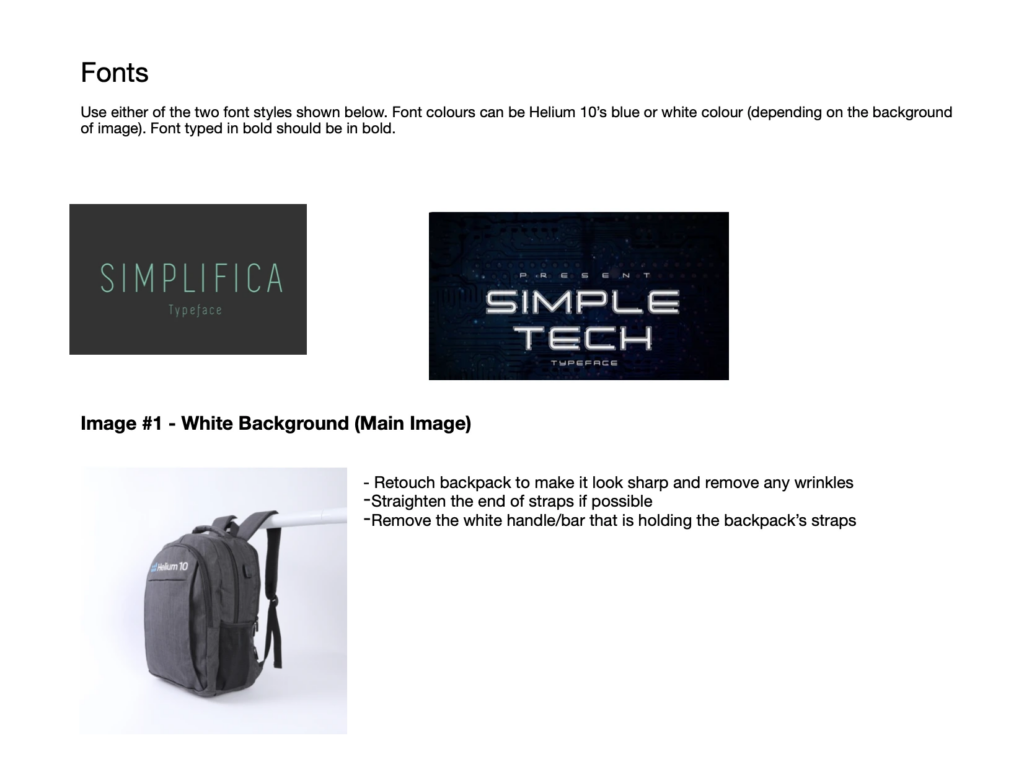
Image #1 – White Background (Main Image)
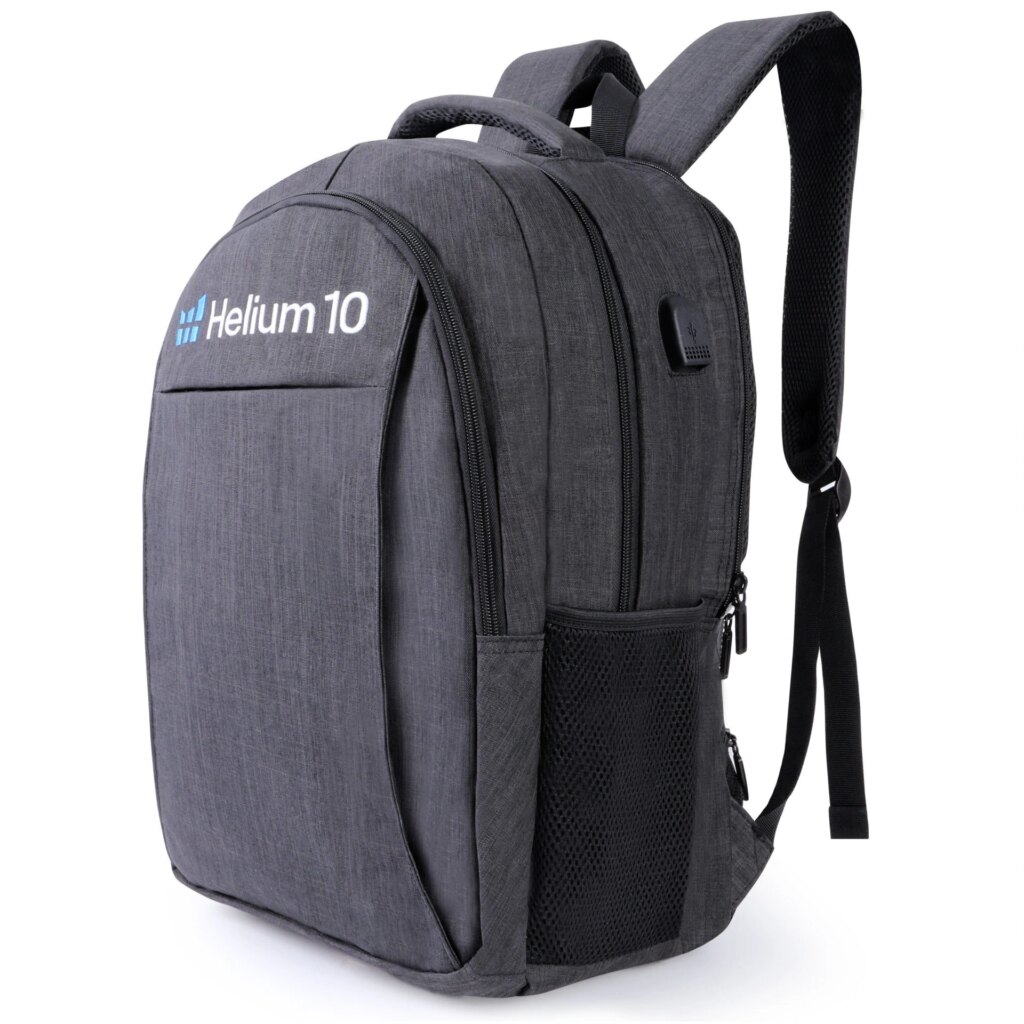
Image #2 – Showcase Luggage Strap & Hidden Back Pocket (Infographic) – ideal for travelling
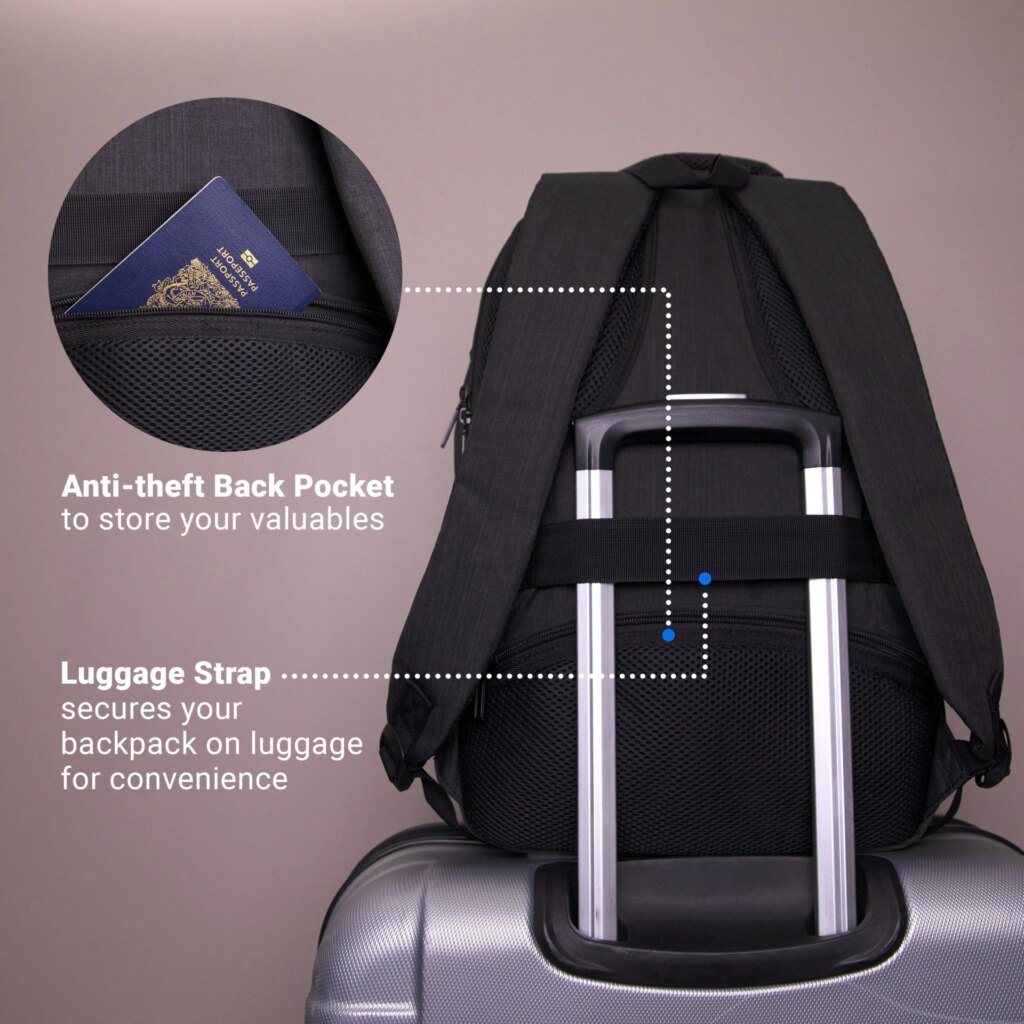
Image #3 – Showcase USB port and dimensions (Infographic) – charge equipment on the go
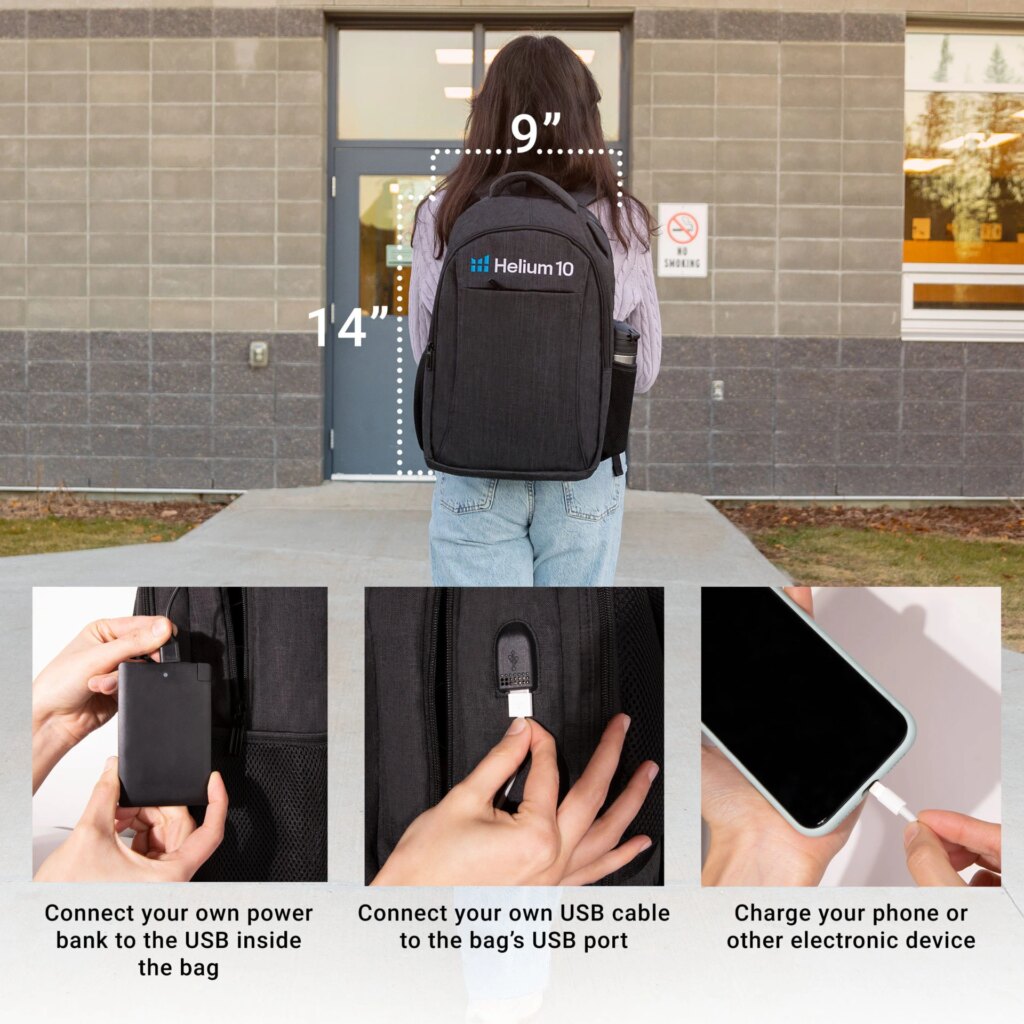
Image #4 – Show back padding, material, and handle (Infographic) – wear as backpack back support or carry with handle
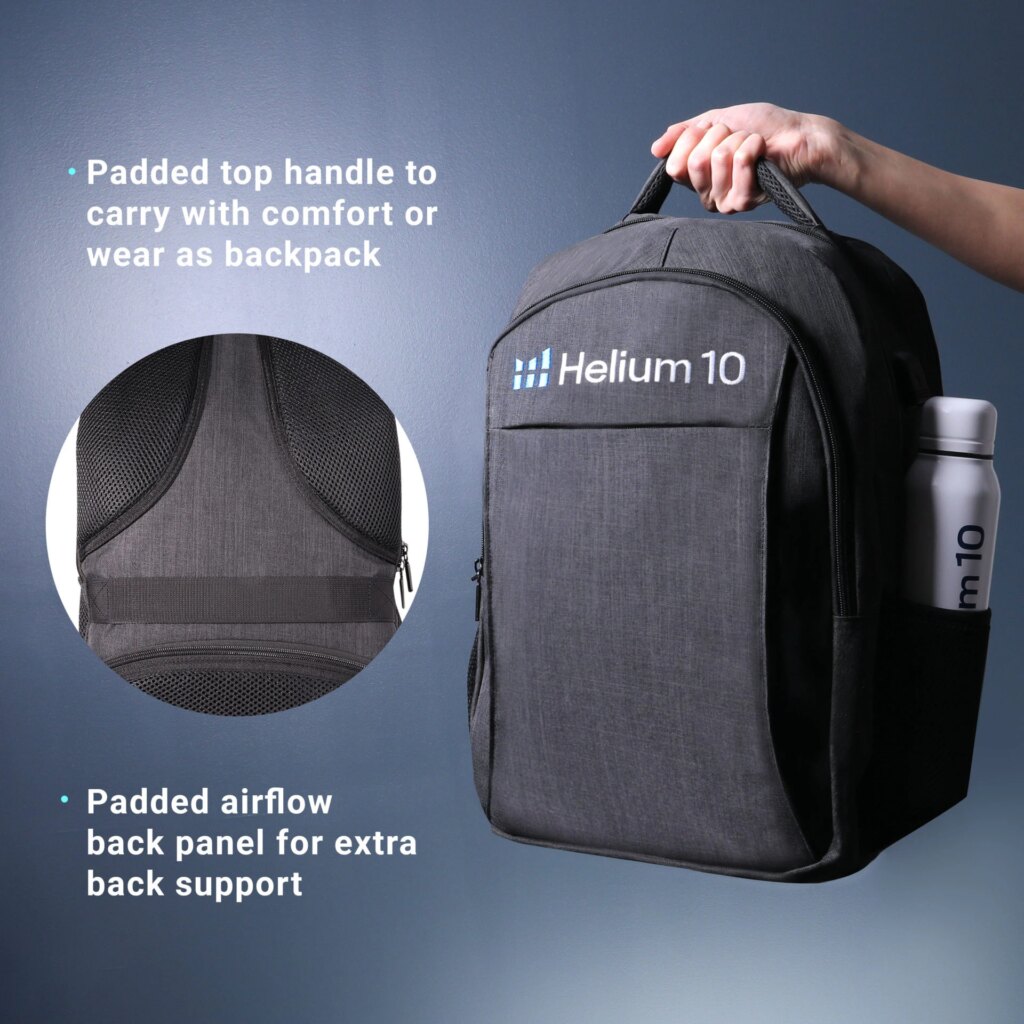
Image #5 – Bag pockets, material, zippers, in grid style (Infographic) – laptop compartment, extra book pocket, polyester, metal zippers
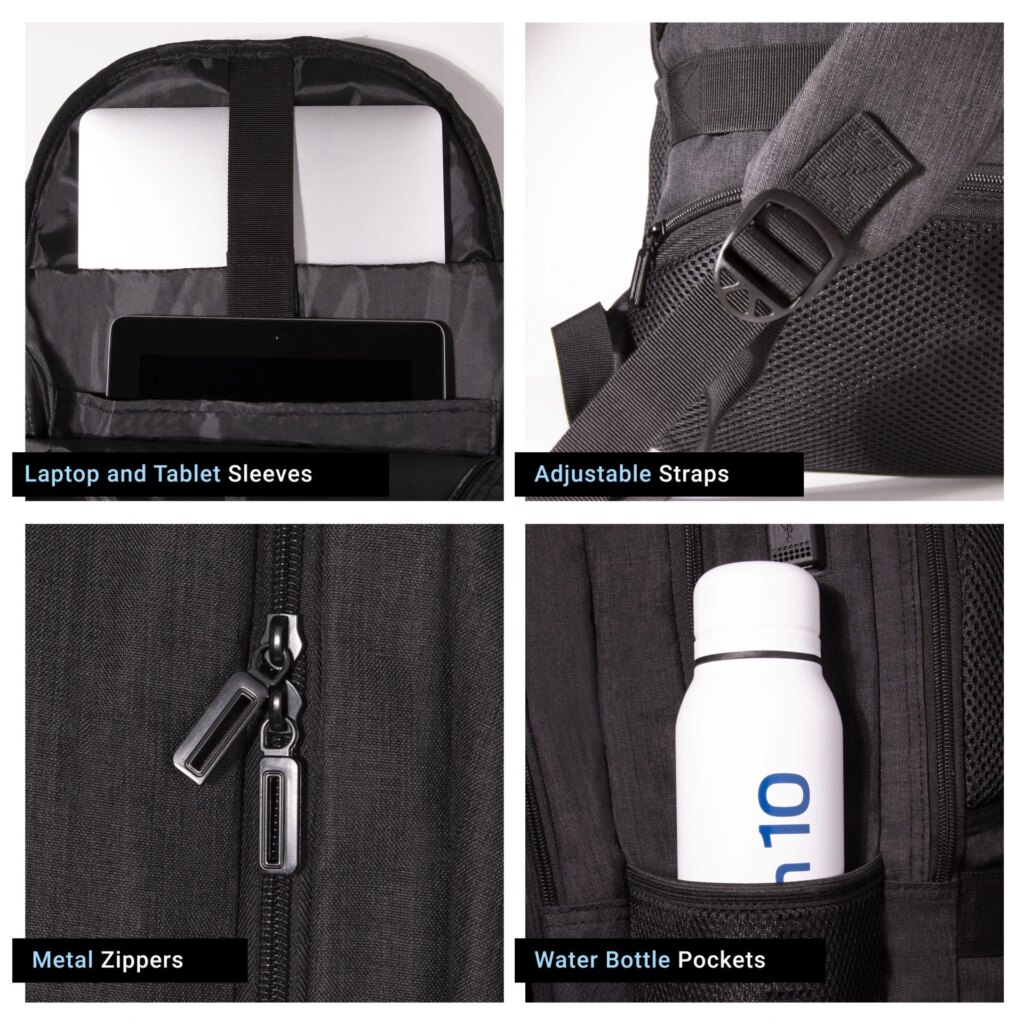
Image #6 – Professional using it for laptop (Lifestyle) – for work
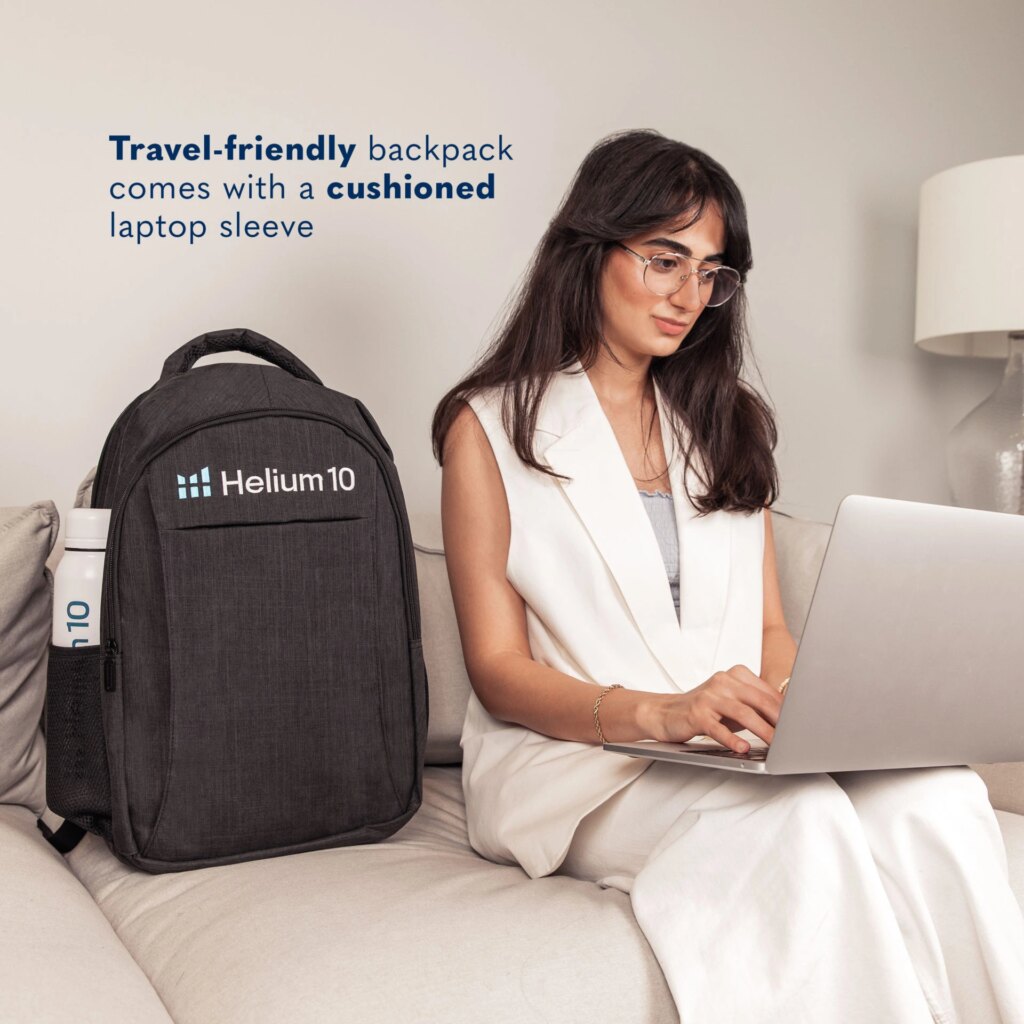
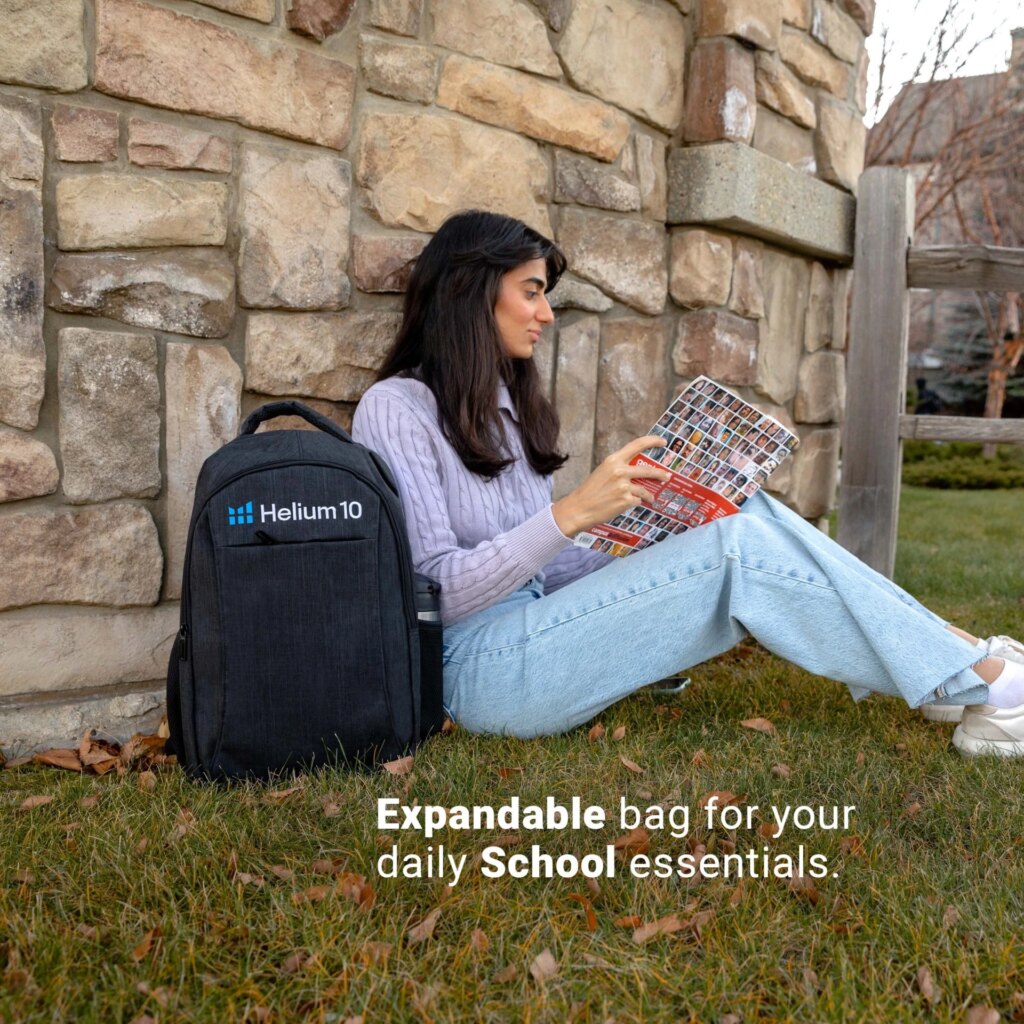
Image #7 – Student using it for books (Lifestyle) – for high school student
Once you have your image plan ready, scout for your models, locations, outfits, props, and any other things you may need for the shoot. In order to create aesthetically pleasing and branded pictures, try to achieve a color scheme that will complement your brand colors as well as the colors of your product. In this case, the Helium 10 brand colors are white and blue. I will make sure that my props and outfits are light, neutral colors, or black and grey so that the product stands out. Your props should not overpower your product!
Do I Need a Professional Photographer?
If you own a DSLR or any kind of a professional camera then guess what? You can do the photography all by yourself, you do not even need an agency to do this part for you!
As for the models, you can either hire models from a modeling agency or use your family or friends. I am going to take pictures of myself (which is also an option!) Remember, it is always best to use models representative of your target audience. For example, if it is a unisex product, try to use all genders in your listing. If it’s a kids product then use kids as models! It is absolutely vital to use diversity.
Studies have shown that you are more likely to buy a product if you see someone from your ethnicity in its ad.
I did some in my mini-home studio against a white backdrop and the rest were all in different locations. You can shoot in auto mode but I prefer shooting in manual mode just because I like to customize my camera settings. When you are taking the pictures, make sure you are shooting in RAW as opposed to JPEG. RAW images will produce higher-quality photos.
Now that I have successfully completed the photoshoot, I will filter out any blurry or extra images and send the rest to my editing team. If you do not know how to use Photoshop or do not have the time to edit the pictures yourself (this can be very time-consuming!) you can outsource the editing. There are plenty of freelance platforms, like Fiverr and Upwork, where you can find professional retouchers and editors or you could give it to an agency too.
Check out Helium 10’s Trusted Partner Directory to get in touch with the right photographer!
I will show you the pictures that I have shortlisted below, along with the editing instructions to walk you through my process. You can send out similar instructions to your editor to really customize your listing images to your taste.
Once the images are ready, just go onto Seller Central to upload them to your listing. Below is a link to my listing, check it out to see how it turned out!
Frequently Asked Questions
Thought Leadership, Tips, and Tricks
Never miss insights into the Amazon selling space by signing up for our email list!
Achieve More Results in Less Time
Accelerate the Growth of Your Business, Brand or Agency
Maximize your results and drive success faster with Helium 10’s full suite of Amazon and Walmart solutions.